1/2 teaspoon dried thyme
skinned turkey breast slices (about 1/4 in. thick)
Salt and pepper
About 3 tablespoons all-purpose flour
1 teaspoon oil
1 1/4 cups chicken broth
2 tablespoons dry sherry
1 tablespoon soy sauce
4 teaspoons cornstarch
2 slices (about 2 oz. total) white bread
3 to 4 tablespoons canned cranberry sauce
Rub thyme over turkey slices and lightly sprinkle with salt and pepper, then coat with flour, shaking off excess.
Place a 10- to 12-inch nonstick frying pan over high heat. When pan is hot, add oil and tilt to coat bottom. Add turkey, without crowding, and brown lightly, turning once, 3 to 4 minutes per batch. Meat should be white in center (cut to test). Transfer turkey to a platter as cooked and keep warm.
Mix broth, sherry, soy sauce, and cornstarch; add to frying pan. Stir over high heat until boiling, about 1 minute. Add salt and pepper to taste.
Prepare Mashed potatoes.
Place a slice of bread on each plate and top each slice with half the turkey. Mound potatoes equally on meat, pour gravy over the sandwich, and accompany with a dollop of the cranberry sauce.
Wednesday, September 25, 2013
Tuesday, April 30, 2013
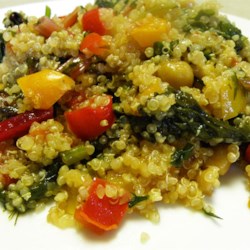
Chicken Sausage on Quinoa with Peppers
For this month's Color Me Badd Diva theme, I randomly ended up with yellow. Several of the Divas are not curry fans (and it definitely smells up your house) so I went with a dish that used yellow peppers (and the Quinoa is "yellowy" I guess.)
Chicken Sausage on Quinoa with Peppers
1 Tbsp butter
¼ onion, diced
sea salt to taste
1 cup quinoa
2 Cups Chicken Broth
2 Tablespoons extra-virgin olive oil
Chicken sausage links
½ onion, cut into thin strips
2 cloves garlic, minced
1 Tsp Spanish paprika
½ Tsp ground cumin
1 red bell pepper, cut into thin strips
1 yellow bell pepper, cut into thin strips
1/2 cup chicken stock
sea salt and pepper to taste
Directions
1. Melt the butter in a large pot over medium heat. Stir in the diced onion and sea salt to taste; cook and stir until the onion has caramelized to a deep brown, about 15 minutes. Once caramelized, pour in 2 cups of chicken stock and the quinoa; bring to a boil over high heat. Reduce heat to medium-low, cover, and simmer until the quinoa is tender, 20ish minutes.
2. Meanwhile, heat the olive oil in a large skillet over medium-high heat. Brown the sausages. Remove to drain on a paper towel lined plate, and keep warm.
3. Reduce the heat to medium, and stir the sliced onion into the remaining oil in the skillet (add a bit more if necessary.) Cook until the edges of the onions begin to turn a golden color, 3 to 5 minutes. Add the garlic, and cook 1 minute more. Season with the paprika and cumin, then stir in the red bell peppers, yellow bell peppers, and 1/2 cup of chicken stock. Bring to a simmer, then cook until the peppers soften, and the mixture reduces and thickens, 10 to 15 minutes. Return the sausage to the skillet, season to taste with salt and pepper, and continue cooking until the sausage is hot. Serve over a bed of quinoa.
Labels:
chicken,
color theme,
Main Dishes,
Wine Diva
Saturday, April 27, 2013
Broccoli Grape Harvest Salad by The Big Cheese
April sort of snuck by the Divas this month. We are actually meeting on May 1st to complete April's "Color-Me-Diva" month. Each diva was given a color, and our meal has to (I guess) have that color in it? Either way, The Big Cheese was given PURPLE...I mean, come on...I thought about eggplant? A purple colored wine? However, I kept coming back to grapes. I love them, my family loves them, who doesn't love grapes? The only problem with grapes is the recipe probably can't be frozen. My bad fellow divas, my bad. You'll just have to enjoy this meal ASAP! We divas know how to NOT waste a good meal. So, I'll stop rambling and give you this fresh recipe that I found (via Pintrest) at Eat Yourself Skinny blog. Who doesn't want to EAT themselves SKINNY? For real.
Here are your ingredients:
1/2 (16 oz) box whole wheat farfalle (bow-tie) pasta
1 lb. fresh broccoli
1/2 cup light mayonnaise
1/2 cup non-fat plain yogurt
1/3 cup sugar
1/3 cup diced red onion
1/3 cup red wine vinegar
1 tsp. salt
2 cups seedless red grapes
6 cooked turkey bacon slices, crumbled
1/4 cup chopped pecans
Preheat oven to 350 degrees F. Bake pecans in a single layer in a shallow pan for about 6 minutes until lightly toasted and fragrant, stirring halfway through. Then prepare pasta according to package directions.
Meanwhile, cut broccoli florets from stems and separate into small pieces using a paring knife. In a large bowl, whisk together mayo, yogurt, sugar, red onion, vinegar and salt and toss with broccoli, hot cooked pasta and grapes. Stir to coat. Cover and chill for up to 3 hours. Stir in bacon and toasted pecans just before serving, enjoy!
Labels:
Cheesy Diva,
color theme,
Pasta,
side dish
Monday, March 25, 2013
Mini Cheesecakes
Well, since the theme for this month's Supper Club was based on our Diva name, I got to bring dessert! I turned to Pinterest, of course, and found these delicious little cheesecakes that were a cinch to make and perfect for sharing. Also, did I mention that they aren't too terribly bad for you either?!? You can't beat that!
Ingredients
3/4 cups graham cracker crumbs (or Oreos, I suppose!)
2 tbsp. butter, melted
2/3 cup low fat cream cheese
6 tbsp. fat free cream cheese
3 tbsp. lemon juice
2 large egg whites
1 1/2 tsp. vanilla extract
1/2 cup sugar
3/4 cup light fruit pie filling, any flavor you want
Directions
Place 12 cupcake liners in a cupcake pan. Preheat oven to 375 degrees.
In a small bowl, combine graham cracker crumbs and butter; mix well. Spoon 1 tbsp. of mixture into bottom of each cupcake liner and press down gently; refrigerate until ready to use.
In a medium bowl, with an electric mixer, beat both types of cream cheese until fluffy. Add in lemon juice, egg whites, vanilla and sugar; beat until smooth.
Spoon cream cheese mixture evenly into cupcake liners; bake until set, about 15 minutes. Remove from oven and allow to cool.
DO NOT BE LIKE MR. DESSERT DIVA AND BEGIN EATING THE CHEESECAKES NOW. THEY ARE WARM AND DO NOT HAVE THE FRUIT ON TOP. THEY ARE NOT GOING TO BE VERY GOOD. ALSO, DO NOT ASK DESSERT DIVA WHY HER CHEESECAKES AREN'T VERY GOOD, AT THIS POINT. THAT WILL NOT SCORE YOU ANY POINTS.
OK, I'm glad I got that off my chest. :)
Top each cheesecake with 1 tbsp. of pie filling. I used cherry and blueberry, but use whatever makes you happy here. They will be delicious...I promise! Enjoy!
Source: www.recipe-diaries.com
Wednesday, March 20, 2013
Chimichurri Sauce
What do you get when you combine cheese, wine, sauce, dessert, gourmet fanciness, and down home goodness? You get a group of awesome ladies going into their 4th year of monthly gatherings of meals, wine, and laughter. I can't imagine life without these girls!
Our theme this month is a meal inspired by our diva name. Since I am Saucy Diva, I am sharing a recipe for homemade chimichurri sauce. Chimichurri sauce is great because it can go on pretty much anything! I will be serving on top of grilled steaks, but you can also use it on chicken, salmon, in salads, on tacos, or just dip your chips in it.
Ingredients:
1/2 cup finely chopped cilantro leaves (about 1 cup before chopping)
1/2 cup finely chopped flat leaf parsley leaves (about 1 cup before chopping)
2 T minced garlic
3 T fresh lemon juice
2 tsp. red wine vinegar
1 tsp. cayenne pepper (or less, if you're a wimp like me)
1 tsp. ground cumin
1/2 cup olive oil
Preparation:
1. Finely chop the cilantro, parsley, and garlic, either by hand or in a food processor with steel blade. I HIGHLY recommend the food processor. It is a lot of chopping, especially if you're making a big batch. Which you should. Because this stuff is awesome!
2. Put ingredients into a bowl and add lemon juice, red wine vinegar, cayenne pepper and cumin and stir to combine. Then stir in olive oil until mixture is well blended.
3. Let sit at room temperature at least 15 minutes before serving. Store left over sauce in the fridge.
Labels:
Our Story,
Sauce,
Saucy Diva,
Summer Grilling
Tuesday, March 19, 2013
Cheesy Chicken & Stuffing By: The BIG Cheese
Here I, The Big Cheese, sit at a local library...trying not to think of cheese. What's the use?!
Searching around for the healthiest/cheesiest recipe I could find. I found this recipe at http://www.emilybites.com/2012/03/cheesy-chicken-stuffing.html
* I cut her recipe in half, just FYI *
Ingredients:
4 thin boneless skinless chicken breast cutlets
3 slices 2% reduced fat Swiss cheese
1/4 cup milk
1/2 can of Campbell’s cream of chicken soup
1/2 box of chicken flavored stuffing mix (such as Stove Top)
1/4 stick of butter, melted
Directions:
1. Preheat oven to 350 degrees. Lightly mist your baking dish.
2. Place the chicken breasts in a single layer across the bottom of the baking dish. Tear the cheese slices into pieces and use them to cover the breasts.
3. In a medium bowl, mix together the milk and cream of chicken soup until combined. Pour over the tops of the chicken.
4. In a large bowl, stir together the stuffing mix and melted butter until stuffing is coated. Sprinkle the stuffing mix over the tops of the chicken.
5. Place in the oven and bake uncovered for 35-40 minutes.
YummmmmmmmmmmmmmmO!
Garlic Chicken with White Wine Sauce
Recipe adapted from www.simplyrecipes.com
Ingredients
• 2 chicken breasts & 2 drumsticks (or whatever chicken pieces you prefer)
• Salt and freshly ground black pepper
• 1 whole head of garlic, cloves separated but not peeled
• Olive oil
• About 1 cup white wine,
• Tarragon
• Thyme
Lightly smash the garlic cloves with the side of a heavy chef's knife, just enough to break the cloves. Leave peel on.**
Pat the chicken pieces dry and sprinkle pieces generously with salt and pepper.
Heat 3 Tbsp. olive oil in a Dutch oven (or a large thick-bottom pan with a tight fitting cover) on medium high. Brown the chicken pieces on all sides. Lay the chicken pieces on the hot oil, do not move until browned, then turn over to other side using tongs. Remove from pan when browned.
Add a little more olive oil to the pan if necessary. Add the garlic and sauté until golden brown, about 3 minutes. Add the wine and the herbs. Bring to a boil. Add the chicken pieces. Reduce the heat to medium low. Cover the pan and simmer until the chicken is cooked through. Move the chicken pieces from top to bottom every 5 minutes for about 20 minutes. Chicken is done when a meat thermometer inserted into thickest part reads 180°F for thighs and 170°F for breasts.
Season to taste with salt and pepper. Transfer chicken pieces to a platter; spoon garlic sauce over the chicken.
Serve alone or with rice, noodles, baked or mashed potatoes.
**Leaving the peels on the garlic is traditional in Mexican cooking. The peels do have flavor, much like the shells of shrimp. You don’t eat them, but when the dish is done, the garlic just slips out of them.
Wednesday, February 20, 2013
Italian Beef "Sammiches"
I love that I grew up just outside of Chicago, although I don't think I really appreciated it until I moved to Indianapolis. Indy is great, and I don't foresee myself leaving anytime soon, but there are things I miss. The food one of those things. There was rarely a family gathering, a sports banquet, or a weekend take out meal where Italian Beef Sandwiches ("Sammiches" if you're from the Chi) weren't served. I'm especially proud of this Chicago staple because they were "invented" on my side of town, the sout side (the h isn't pronounced). My meal this month is an easy way to make that Windy City delicacy. When you order one in the city, you're asked if you'd like it wet or dry. Dry is just as it sounds...just the meat on the bread with the toppings. If you'd like to try it wet, dip the assembled sandwich in the broth. Both ways are delish although I prefer them wet!
Serves 3-4
Ingredients:
1 - 1 1/2 lbs roast beef (from the deli)
1 envelope of dry Italian dressing
1 can of low sodium beef broth (I use about triple the amount of broth. The wetter the better!)
4 French bread rolls - I know...WHAT? Italian beef on french bread? Yes! It is all in the bread people. French bread is soft and crusty, but firm enough to stand up to the "juice".
Optional traditional toppings:
mozzerella cheese
banana peppers
hot peppers
Preparation:
- In a large pot, mix the broth and the Italian dressing
- Submerge the beef in the broth
- Simmer on LOW for an hour
- Assemble sandwich
- To dip or not to dip? That is the question. Seriously, dip it. You will not be sorry.
There is an official beef sammich eating stance too! Hold the sammy with both hands and rest elbows on the table. Lean away from the sammich so you don't dribble on your shirt. You're welcome.
Da Bears.
Monday, February 18, 2013
Nancy Smith's Chicken - By The Big Cheese
Talking a little stroll down memory lane with this one, folks. My absolute favorite meal growing up with Momma Big Cheese was her little number called "Nancy Smith's Chicken". Even though her maiden name is Smith, we don't have any Nancy's (that I'm aware of!). Either way, This meal is comforting to my soul and belly. I hope you enjoy it as much as I always have.
Warning - it's WAAAAAAAAY better when Momma Big Cheese makes it! No doubt about that one. Love you, Patti!
* Thank you google images for the pic *
What you'll need:
1 bag (10 oz) of frozen peas
4 C cooked chicken, cut up
1 can cream of mushroom soup
1/2 C miracle whip
1/2 t curry powder
1 C shredded cheddar cheese
What you'll do:
1. Spread peas into dish
2. Put chicken on top
3. In separate bowl, mix soup, mayo and curry powder. Pour over chicken.
4. Cover with cheese
5. Let stand in fridge overnight
6. Bake at 350 for 30 minutes, uncovered
Labels:
Cheesy Diva,
chicken,
Comfort Foods,
Memory Lane
Wednesday, January 16, 2013
Slow Cooker Hawaiian Meatballs
It's here! The 4th annual Diva "Ball" theme! We love us some spherical food. For this month's meal, I am making Hawaiian Meatballs that you can conveniently make in your slow cooker.
Ingredients:
32 oz. package of precooked, frozen meatballs
13.5 oz can of unsweetened pineapple chunks (put juice aside)
1 large green pepper, diced
1 cup of brown sugar
2 Tbl. cornstarch
2/3 cup of white vinegar
2 Tbl. Soy sauce
Rice
Preparation:
Place meatballs in crock pot and top with green pepper and drained pineapple chunks. In a separate bowl, mix reserved pineapple juice, brown sugar, cornstarch, vinegar and soy sauce. Pour sauce over meatballs, pineapple and green peppers. Cook on low for 3-4 hours or until heated through.
Prepare the rice and serve with the meatballs on top.
Does it get any easier??
Labels:
Balls,
Beef,
Comfort Foods,
crock pot,
Meatballs,
Saucy Diva,
Slow Cooker
Subscribe to:
Posts (Atom)